
Analog Building Blocks
Learn the analog circuit blocks that appear in sensors, power stages, signal conditioning, LED control, and real-world electronics interfaces.
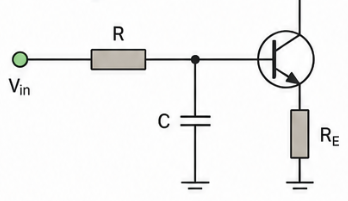
1. What you will learn
2. Analog formulas
3. Learning modules
Work through these modules in order. Each module explains one analog building block and shows how it is used in real electronics projects with microcontrollers, sensors, LEDs, motors, and power stages.
1 Voltage dividers Understand voltage scaling, loading, input impedance, and why dividers are not power supplies.
A voltage divider uses two resistors to create a smaller voltage from a larger one. It is commonly used to scale signals down so they can be safely measured by a microcontroller ADC, or to create a simple reference voltage.
The important point is that a voltage divider only works correctly when the connected load draws very little current. If the load current is too high, the output voltage drops and the divider no longer gives the expected value.
- Use it for signals: Good for ADC inputs, sensor outputs, and simple reference points.
- Do not use it as a power supply: A divider cannot reliably power modules, motors, displays, or LEDs.
- Check ADC limits: For example, a 3.3 V microcontroller input must not receive 5 V.
- Watch the resistor values: Very low values waste current; very high values can become noisy or unstable with ADC inputs.
Practical example: If a sensor outputs 5 V but your ESP32 input only accepts 3.3 V, a voltage divider can scale the signal down before it reaches the ADC pin.
2 Capacitors Use capacitors for smoothing, timing, filtering, buffering, and local decoupling.
Capacitors store electrical charge for a short time. In practical circuits they are used to smooth supply voltage, reduce noise, create timing behavior, filter signals, and help components survive short current peaks.
A very common use is decoupling. A small capacitor placed close to an IC or module helps stabilize the local supply voltage when the circuit suddenly needs current.
- Decoupling: Place small capacitors close to microcontrollers, sensors, and IC power pins.
- Smoothing: Use larger capacitors to reduce supply dips or ripple.
- Filtering: Combine a resistor and capacitor to reduce noise or smooth PWM signals.
- Timing: RC circuits can create delays, slow voltage changes, or simple reset behavior.
- Polarity: Electrolytic capacitors usually have a positive and negative side. Reversing them can damage the capacitor.
Practical example: If an LED strip causes a microcontroller to reset when switching on, adding a suitable capacitor near the power input can help reduce the voltage dip.
3 Diodes Use diodes for polarity protection, flyback protection, voltage drops, and simple clamping.
A diode allows current to flow mainly in one direction. This makes it useful for reverse-polarity protection, signal clamping, voltage drop applications, and protecting circuits from inductive voltage spikes.
One of the most important beginner applications is the flyback diode. When a relay, solenoid, or motor coil is switched off, it can generate a high voltage spike. A flyback diode gives this current a safe path and protects the transistor or microcontroller circuit.
- Polarity matters: A diode has an anode and cathode. The cathode is usually marked with a stripe.
- Forward voltage: Silicon diodes often drop more voltage than Schottky diodes.
- Flyback protection: Always consider a diode when switching coils, relays, solenoids, or small motors.
- Current rating: The diode must survive the current in the application.
- Reverse voltage rating: The diode must also handle the voltage it blocks.
Practical example: If an ESP32 switches a relay through a transistor, the relay coil should normally have a flyback diode across it to protect the switching transistor.
4 Transistor switches Drive LEDs, relays, motors, fans, and LED strips without overloading GPIO pins.
A microcontroller pin can only provide a limited amount of current. Transistors and MOSFETs allow a small control signal to switch a larger load, such as an LED strip, fan, relay, motor, or high-power LED.
For many DIY electronics projects, a logic-level N-channel MOSFET is used as a low-side switch. The load is connected to the positive supply, the MOSFET switches the path to ground, and the microcontroller controls the gate.
- Use a common ground: The microcontroller ground and load power supply ground usually need to be connected.
- Use a logic-level MOSFET: The MOSFET must fully turn on with the available gate voltage, for example 3.3 V from an ESP32.
- Add a gate resistor: A small resistor can reduce ringing and limit fast gate current peaks.
- Add a gate pulldown: This keeps the MOSFET off while the microcontroller is starting up.
- Protect inductive loads: Motors, relays, and coils may need flyback protection.
Practical example: An ESP32 pin should not power an LED strip directly. Instead, the ESP32 controls a MOSFET, and the MOSFET switches the higher strip current safely.
5 Sensor conditioning Prepare analog sensor signals before reading them with an ADC.
Sensor conditioning means preparing a real-world sensor signal so a microcontroller can read it reliably. Many sensors do not output a perfect clean voltage. The signal may be too small, too noisy, too high, too slow, or affected by cable length and power supply noise.
The goal is to bring the signal into the correct voltage range, reduce noise, and make the measurement stable enough for the project. Depending on the sensor, this can be done with a voltage divider, RC filter, pull-up resistor, amplifier, buffer, or software averaging.
- Match the voltage range: The sensor output must stay within the ADC input range.
- Filter noise: An RC filter can smooth fast noise before the ADC reads the signal.
- Use stable power: Noisy supply voltage can create unstable sensor readings.
- Calibrate readings: Convert raw ADC values into real units such as temperature, light level, or position.
- Check response time: Too much filtering can make the sensor react slowly.
Practical example: A light-dependent resistor can be used with a voltage divider to create an analog voltage. The microcontroller reads this voltage and converts it into a brightness value.
4. Project connections
These examples show where the topic appears in practical ElektroBox builds.
5. Common mistakes
Skipping basic checks
Always verify power, ground, polarity, pin assignment, and the simplest possible test case first.
Changing too many things at once
Change one variable, test again, and document the result. This keeps debugging controlled.
Ignoring component limits
Check voltage, current, heat, pin limits, and power ratings before assuming a circuit is safe.
Final takeaway
Analog building blocks connect digital controllers to real-world signals, sensors, and loads.